

This guide provides detailed instructions on how to create and implement a new time frame for holidays or custom events using the Carolina Digital Phone Manager Portal. Effectively managing time frames ensures your call forwarding and voicemail settings use appropriate greetings and routing during specific time periods. If you need any assistance, you can call 611 from your Carolina Digital Phone or (336) 346-6000 to reach our support team. They can answer questions or create a time frame for you.
Understanding Time Frames

What is a Time Frame?
A time frame in the Carolina Digital Phone system is a pre-defined period of time during which specific call forwarding or answering rule behaviors are activated. You can specify a time frame for various requirements, such as holidays, extended breaks, or after-hours operations. The time frame feature, offered through our cloud-hosted system, can auto-adjust the handling of incoming calls. These can be routed to voicemail, forwarded to a mobile phone, or even play a specific greeting.
Importance of Setting a Time Frame
Setting a time frame is crucial for maintaining professional communication and ensuring calls are handled appropriately at all times. By defining specific time intervals for holidays or other events, you can automatically adjust your call forwarding, voicemail, and answering rules. Proper time frame configuration avoids missed calls and ensures that callers receive the correct information and are directed to the appropriate resources, enhancing customer service and internal communication. Time frames are used in conjunction with answering rules.
Types of Time Frames: Holiday vs. Custom
Carolina Digital Phone offers two primary types of time frames, as summarized below. The selection of a time frame depends on your requirements.
Holiday Time Frame
Designed for recognized holidays, allowing you to specify a date or a range of dates when your office is closed.
Custom Time Frame
Provides greater flexibility, enabling you to define a new time frame based on specific dates, days of the week, and even specific time intervals.
Steps to Create a New Time Frame
Accessing the Carolina Digital Phone Manager Portal
To begin, you’ll need to access the Carolina Digital Phone Manager Portal. Use your provided credentials to log in. Once logged in, you will be able to navigate to the time frame section. Ensure your local internet connection is stable to avoid interruptions during the time frame creation process. A good Internet connection ensures a smooth experience when you create your desired new time frame.
Navigating the Time Frame Section
To make changes to time frames, you must have Office Manager privileges. If you are unsure of your privilege level, please contact Carolina Digital Phone’s customer support team by calling 611 from your Carolina Digital Phone or (336) 346-6000.
Once logged in, navigate to the “Time Frames” section of the portal. Here, you will see a list of existing time frames and an option to add a new time frame. Next, navigate to “Domain” and click the hyperlink. You will see a list of existing time frames. To add a new time frame, such as “Holiday,” click on the “Add Time Frame” button to begin creating your custom or holiday time frame.
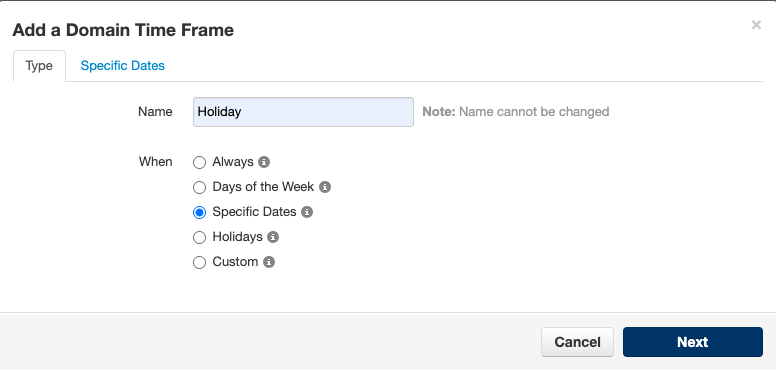
Naming A Time Frame
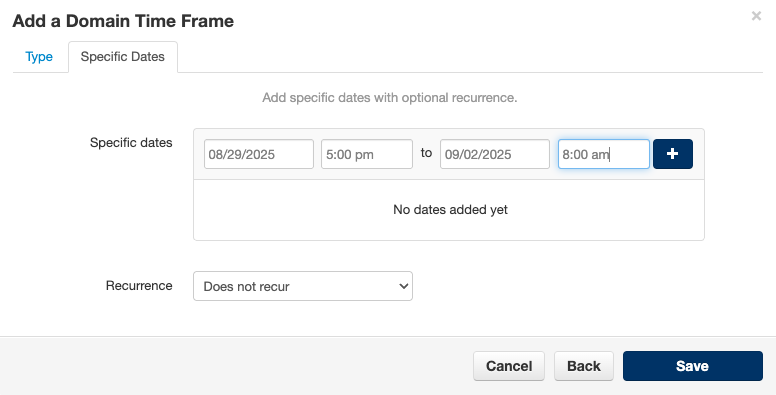
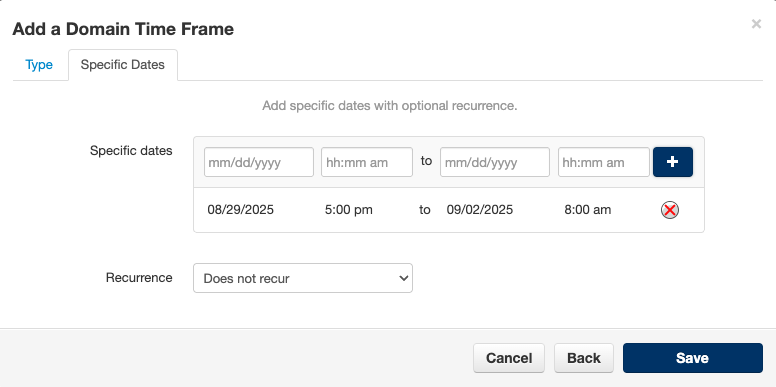
In the box that opens, enter the name of your time frame – such as “Holiday.” When creating a Holiday time frame, select “Specific Dates” and click next. In the box that opens, enter the specific start date and time, followed by the specific stop date and time. Be sure to click save, when finished setting up your time frame.
Inputting Specific Dates and Days of the Week
In this step, you will specify the specific dates and/or days of the week for your new time frame. For a custom time frame, you can select a start date, an end date, and the specific days of the week this time frame should be active. This allows you to create rules that apply only during specific parts of the week, catering to your unique requirements.
Setting Up Holiday Time Frames
Defining Holiday Time Frames
Setting up holiday time frames involves designating specific dates or ranges of dates when your office will be closed or operating under different call forwarding rules. When you create a holiday time frame, the system auto-adjusts your call handling based on the specific dates you’ve defined. Time frames are used in conjunction with answering rules.
Choosing Specific Holidays
When creating a holiday time frame, you can either select specific holidays from a list or manually input the dates. We recommend manually inputting dates and times for flexibility. Specify the start and end dates for each holiday to ensure accurate call routing. Remember to check your local holiday schedule and adjust your time frame accordingly for each specific holiday period. Keep in mind that you may need to make adjustments for accuracy.
Customizing Your Holiday Time Frame
To further customize your holiday time frame, consider adjusting your greeting messages to inform callers about your office closure for the holiday. You can also configure call forwarding options to redirect calls to a mobile phone or voicemail during the holiday period. Note your phone number for verification. The system uses a cloud VOIP host PBX to handle specific time-based call instructions.
Managing Your Time Frame
Editing Existing Time Frames
Once you create a time frame, you might need to edit it in the future to adjust the specific dates, days of the week, or specific time intervals. To edit an existing time frame, navigate to the “Time Frames” section in the Carolina Digital Phone Manager Portal, select the time frame you want to modify, and click the “Edit” button. From there, you can make the necessary changes and save your updates. This ensures your call forwarding rules are always accurate.
Deleting Time Frames
There may be instances where you need to remove a time frame that is no longer required. To delete a time frame, go to the “Time Frames” section, select the time frame you want to delete, and click the “Delete” button. A confirmation prompt will appear; confirm the deletion to remove the time frame from your system. Make sure you note that deleting a time frame will stop any call forwarding or answering rules associated with it from being activated.
Previewing Your Time Frame Setup
Before finalizing your time frame setup, it’s wise to preview how your call forwarding and answering rules will behave during the specific time period. The Carolina Digital Phone Manager Portal allows you to simulate different scenarios based on your time frame configurations. Use this preview feature to ensure that your calls are handled correctly during holidays or custom events. This helps prevent any miscommunication and ensures a professional experience for callers.
Support and Assistance

Contacting the Support Team
If you encounter any issues while creating or managing time frames or if you need assistance with complex configurations, the Carolina Digital Phone support team is available to help. You can reach our support team by calling (336) 346-6000. Our knowledgeable support staff can guide you through the process, answer your questions, and provide solutions to ensure your call forwarding and voicemail settings meet your specific requirements.
Using 611 for Quick Support
For quick and easy access to support, you can call 611 directly from your Carolina Digital Phone. This shortcut connects you immediately to our support team, allowing you to quickly address any urgent issues or questions regarding your time frame setup. Use this option when you need immediate assistance, such as during a holiday or before a specific time-sensitive event. We are happy to help you specify the proper call forwarding options.
Requesting Support for Time Frame Creation
If you prefer, you can request that the Carolina Digital Phone support team create the time frame for you. The support team is invaluable if you have intricate call forwarding or answering rule requirements. Simply contact our support team via phone number 611 from your Carolina Digital Phone or (336) 346-6000 and provide them with the specific dates, days of the week, and specific time intervals you want to define for your new time frame. They will handle the configuration, ensuring that everything is set up correctly according to your needs. For additional help and video tutorials, visit our training page.